


Achieving motion blur
By Rex Dolby
“Doors” will be the competition theme in prints and slides when the Van Wert Area Photography Club meets tomorrow evening, Thursday, March 9, at 7 p.m., at 114 S. Race St. in Van Wert. The photographer may enter four prints no larger than 4×6 inches, or four images on a jump drive for projection. Those participating are reminded that they should be prepared to supply information about the camera settings and other details of the shot.
We’ve given some ideas on how to blur the background so the subject stands out, and we’ve talked about panning so the subject stays sharp while the background is smeared to suggest the subject was really moving quickly. This week we’ll go in a different direction by adding a motion blur to an object that is sharp, so we can make it look as if the subject’s movement or something in the picture is really quick.
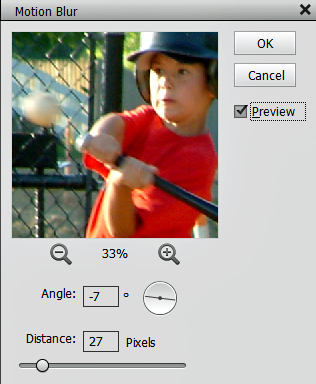
There may be times when we either freeze the action, the subject is stationary, or has moving parts such as a helicopter that appear to be stopped. Afterwards, we decide it would look more interesting or natural if something in the picture looked as if it were moving. That’s where the Motion Blur feature on your computer would come into play. Again, depending on your editing program, clicking on Motion Blur may bring up a screen similar to the example.
- Open the picture you wish to adjust and highlight what you want to appear to be moving.
- Open Filters and left click on Blur, select Motion Blur and you’ll get a screen similar to the illustration.
- Click on Preview so you can see the degree of change you are making.
- Click on the – to zoom back to see more of the picture or the + to enlarge the picture. At this point, you can put your curser on the picture and drag it to the section you plan to alter.
- Move the line in the circle with your cursor to match the path the object is taking.
- Move the slider to select how much blur you wish to add.
- Click OK when you are satisfied with the result.
If this is new information for you, give it a try and see what you think. Good luck.
POSTED: 03/08/17 at 2:45 pm. FILED UNDER: Camera Club News